How to Use a Fire Extinguisher: The Steps and the Common Mistakes
Using an extinguisher correctly does not start with pulling the pin. From the decisions made before you engage to fire class, stance and what happens to a used cylinder — the sequence that works in the field.
 Yangın Takip Ekibi
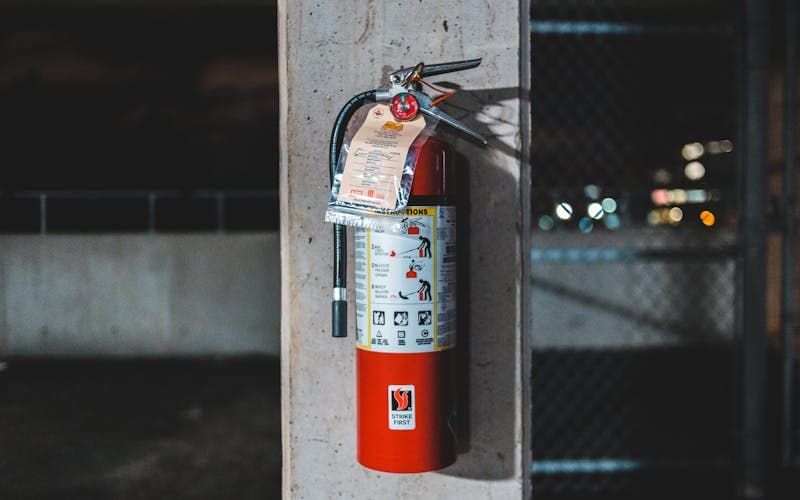
The first thirty seconds of a fire largely decide whether the incident stays a minor disruption or turns into a damage claim. The extinguisher is there, mounted in its place, its tag current — and yet, when it matters, nobody uses it correctly. The steps for using a fire extinguisher are printed on the cylinder label in most facilities, but that label only gets read the moment flames appear for the first time. In a panic, nobody reads labels.
The second problem is that correct use is not a reflex but a chain of decisions. Before you take the extinguisher off the wall, you have to assess the class of the fire, its size, the smoke in the room and the state of your escape route. A wrong decision to engage does not put the fire out; more often it makes the fire worse and removes the responder's chance to withdraw.
This article is written for the field crews of fire safety service companies and for the managers responsible for fire safety inside facilities. It walks through the steps of use, the decisions that come before those steps, and what has to happen after the incident. The goal is not to make anyone memorise a four-letter acronym, but to show why each step sits where it does.
Three Decisions Before You Take the Extinguisher
Response does not begin by grabbing the cylinder. It begins with three fast decisions. They take a few seconds, and they determine whether the response will be safe at all. This is also the part most often skipped in the field: people run to the nearest cylinder on reflex, when what actually matters is the assessment made before that run.
The first decision is whether the alarm has been raised. If the person who spots the fire tries to handle it alone and fails, the time lost never comes back. People in the area have to be warned, the fire brigade has to be notified, and evacuation has to start. Response is not an alternative to evacuation; it is something done in parallel while evacuation is under way.
The second decision is whether the fire is still small enough for a portable extinguisher. Portable units are designed for incipient fires. If flames have reached the ceiling, if the room is filling with smoke, or if the heat prevents you from getting within a few metres, you do not engage. The only correct action then is to close the door and leave the area.
The third decision is where your escape route is. The responder should always be positioned facing the flames with the door or an open exit route behind them, never with their back to the fire. Ending up between the fire and the exit is the most common and most severe positioning error seen in the field. Ask these three questions in order:
- Has the alarm been raised and has evacuation started?
- Is the fire still in its early stage, or has it grown?
- Is my withdrawal route open and behind me?
The Steps for Using a Fire Extinguisher, in Order
Once the three decisions are made, the physical use begins. For most portable dry chemical powder and carbon dioxide extinguishers the logic is the same: release the safety, fix the target, discharge, spread. The order is not arbitrary; each step depends on the condition the previous one created.
First, carry the cylinder upright and stop at a workable distance from the fire. Pull the safety pin out, breaking the seal. Squeezing the lever without pulling the pin produces nothing, and this is one of the points where people lose the most time during a real incident. Do not hold the lever down while pulling the pin; a pinched pin will not come free.
Next, release the hose or nozzle and hold it with your free hand. On carbon dioxide units, hold the plastic part of the horn and keep off the metal tube; that section gets extremely cold during discharge and causes contact burns. This is also the moment for a short test burst, which shows you that the cylinder really is charged and that discharge has started. Reaching the fire and only then discovering an empty cylinder leaves you no time to go back.
Then aim. The extinguisher is directed not at the flames themselves but at the base of the burning material, at the fuel surface. Spraying at the tips of the flames only throws powder into the air while the surface feeding the fire stays untouched. Squeeze the lever fully and keep it squeezed; do not stop halfway and wait.
Finally, apply the sweeping motion. Move the nozzle slowly across the burning surface, left to right and back again, until the whole base is covered. Once the flames are down, do not immediately turn your back; wait a few seconds and watch for re-ignition.
Distance, Stance and Direction of Approach
The right sequence of steps is worthless if you are standing in the wrong place. Every extinguisher has an effective discharge range, and that range varies with the type, contents and size of the cylinder. Instead of guessing the figure, start the job knowing the range stated on the cylinder label — which is precisely why the labels on the units your field crews handle have to stay legible.
Discharging from too far away lets the agent disperse before it reaches the burning surface. The cylinder empties and the fire carries on. Getting too close creates two separate risks: heat that removes your ability to withdraw, and, especially in liquid fuel fires, a pressurised stream that splashes the burning liquid around. The correct distance is the farthest point from which you can still reach the surface.
Two rules on stance never change. The first is to keep the wind or the air current behind you. Outdoors, and indoors where ventilation is strong, discharging against the current drives powder or gas straight into the responder's face. The second is to get low; kneeling or half-crouching keeps you under the hot smoke layer and gives you a better line to the base of the burning surface.
Direction of approach also depends on the type of fire. In a running or dripping fuel fire, you work downward from the source, starting where the flow originates. In a fire spread flat across the floor, you start at the nearest edge and push forward, driving the flame front back. Starting from the middle splits the fire in two and leaves you managing two fronts at once.
How Use Differs by Fire Class
The same steps do not apply identically to every fire, because the agent inside the extinguisher has to match the material that is burning. Fire classes are marked with letters on the cylinder, and selection follows those letters. Engaging with a mismatched unit is at best ineffective; at worst it makes the fire bigger.
In solid material fires — wood, paper, textiles — water and foam based extinguishers and multi-purpose dry chemical powder units are used. In these fires, smouldering can continue even after the surface flames are out, which is why cooling and a follow-up check matter.
In liquid fuel fires the sweeping motion is decisive. Directing the pressurised stream straight down onto the liquid causes splashing. You have to cover the fuel surface starting from the edge, letting the stream pass tangentially across it. In electrical installation and panel fires, water and foam based units are not used; carbon dioxide or suitable dry chemical powder extinguishers are preferred, and the power is cut first where possible.
Cooking fires involving vegetable and animal fats form a separate class and call for a separate extinguisher. Here the aim is not to blow the flame apart but to blanket the surface, cut off oxygen and bring the temperature down. Using powder or water can make hot oil erupt violently. Mapping in advance which class of risk sits at which point in the facility is what puts the right cylinder from your inventory in the right place. Standards covering portable extinguishers, such as TS ISO 11602, together with the Turkish regulation on the protection of buildings against fire, provide the framework for equipment suitability.
The Most Common Mistakes During Use
The mistakes repeated in the field look remarkably alike, and nearly all of them come from breaking the order of the steps. Knowing them also tells you what to focus on during drills.
The most widespread mistake is aiming at the tips of the flames. It feels visually correct, because the flame is what you want gone. But the flame is only the outcome; the source is the surface of the burning material. In a response that never reaches the base, the cylinder empties and the fire continues from where it left off.
The second common mistake is squeezing the lever in bursts. Spraying intermittently in an attempt to "use it sparingly" gives the fire a chance to recover in every gap. Portable extinguishers already have a short discharge time; divided up, no single portion of it is enough. The right approach is to fix your target and then discharge without interruption.
The third mistake concerns position: turning your back to the door, moving behind the fire in a confined space, or advancing inward in a room with a single exit. The fourth is holding the cylinder inverted or tilted; some extinguisher types will not discharge properly on their side. The fifth is leaving the area without checking a fire that appears to be out. Other frequently seen points include:
- Squeezing the lever without pulling the pin and assuming the unit is faulty
- Gripping the metal horn of a carbon dioxide unit and taking a cold burn
- Re-hanging a used cylinder on the assumption that it still holds pressure
- Reaching for the nearest cylinder without checking the fire class
After the Response: A Used Cylinder Never Goes Back on the Wall
The job does not end when the fire is out. An extinguisher that has been even partially used is no longer a dependable device. Even a single second on the lever starts the expellant gas leaking, and the unit will not deliver the expected performance in the next incident. A used cylinder is not re-hung; it goes to an authorised company for refilling and servicing, and a charged unit takes its place.
For fire safety service companies this stage is an operational matter. When a cylinder is discharged at a customer facility, the record has to show which device was taken from which point, which serial-numbered unit replaced it, and where the discharged unit stands in the refilling process. Without that record, the inventory and the reality in the field drift apart, and the next periodic inspection turns up devices that are not where they should be.
The incident itself is worth recording too. Knowing where and when the fire started, what class it was and what type of extinguisher was used updates the facility's risk map. If a similar fire breaks out twice in the same section, the problem is not the extinguisher but the process in that section. Without this information, whatever precaution you take rests on guesswork.
Finally, the condition of the responder has to be assessed. Smoke inhalation, heat contact and, with carbon dioxide units, cold burns may go unnoticed in the moment. Checking the personnel involved and entering the incident into occupational safety records is also necessary from an audit standpoint.
Without Training and Drills, the Steps Do Not Stick
Read on paper, all of these steps are simple. The problem is that they are not remembered when flames appear. The only thing that closes the gap between a written procedure and actual behaviour is repeated hands-on drilling. Watching a presentation once a year does not close it.
In an effective drill, staff pick the cylinder up, feel its weight, pull the pin themselves and genuinely attack a controlled tray fire. That the cylinder is heavier than expected, that the discharge is shorter than assumed, and that the powder blocks your view are things you only learn by doing. Those three surprises are the main causes of hesitation in a real incident.
Shift reality has to be taken into account when planning drills. A drill attended only by the day shift does not prepare anyone for a fire at night. Recording the attendance list, the date and the scenario used makes it possible both to plan repeat training and to produce documentation during an audit.
A drill also tests the physical state of the facility. If material piled in front of a mounting point makes the extinguisher unreachable, if the cabinet key is missing, or if the device tag is illegible, these surface only in practice. Logging and closing each of those gaps after the drill also reduces the workload of the next periodic inspection.
Closing
Using a fire extinguisher is more than a memorised acronym. Making the right decision to engage, setting up your position correctly, choosing a unit that matches the class of the fire, and putting both the device and the record back in order afterwards form a single whole. Skipping any one of the steps renders the rest ineffective.
On the operator side, what holds that whole together is keeping devices and records traceable. If the answers to which device sits in which facility, when its next refill is due, and who attended which drill are scattered, the readiness in the field is scattered too. With Yangın Takip we give fire safety companies one place to manage customer accounts, facility and inventory data, the periodic inspection calendar and the work of their field crews.
Related reading
- Köpüklü Yangın Söndürücü Nerede Kullanılır? — https://yangintakip.com/en/blog/kopuklu-yangin-sondurucu-nerede-kullanilir-rehber
- Yangın söndürücü dolum süresi ne zaman gelir? (TS ISO 11602-2) — https://yangintakip.com/en/blog/yangin-sondurucu-dolum-suresi-ts-iso-11602-2-rehberi
- Periodic Maintenance Software — https://yangintakip.com/en/cozumler/periyodik-bakim-yazilimi
Bring extinguisher and maintenance tracking into one place
Request a short demo for your company and see the system with your own data in a 14-day free trial.
Request a free demoFrequently Asked Questions
Where on the fire do you aim a fire extinguisher?
Not at the tips of the flames but at the base of the burning material, where the fuel is. The flame is only the outcome; unless the source is out, the surface re-ignites. Point the nozzle at the base and sweep left to right until the whole surface is covered.
Can a fire extinguisher be used again after one discharge?
No. Even one second on the lever starts the expellant gas leaking, and the unit will not perform as expected in the next incident. A used cylinder is not re-hung; it goes to an authorised company for refilling and servicing, and a charged unit takes its place.
Which extinguisher is used on an electrical panel fire?
Water and foam based extinguishers are not used; carbon dioxide or suitable dry chemical powder units are preferred. Where possible, the power to the area is cut before you engage. On a carbon dioxide unit, keep off the metal horn — it gets cold enough during discharge to cause a cold burn.
How close should you get to the fire when responding?
The effective discharge range depends on the type and size of the cylinder and is stated on the device label. The correct distance is the farthest point from which the agent still reaches the burning surface. Discharging from too far wastes the cylinder; getting too close removes your ability to withdraw.
Is writing a procedure enough without running drills?
It is not, because a written procedure is not recalled during an incident. Staff need to pick the cylinder up, feel its weight and pull the pin themselves. Hands-on drills also expose physical gaps, such as an extinguisher blocked by material stacked in front of it.
Related Posts
Woodworking Shop Fire Safety: Sawdust, Electrical and Storage Guide
October 25, 2026 · 7 min read

How to Test a Fire Alarm Call Point: Maintenance and Inspection Guide
October 24, 2026 · 8 min read
Key Features of Periodic Maintenance Tracking Software for Fire Safety
October 23, 2026 · 8 min read